After reading the Nine Steps of Stamping Die Design article. You will know about the 9-core stamping die design steps.
What is a stamping die?
A stamping die is a method of pressure processing parts, so the design of a stamping die is very helpful to the manufacturing process of parts. How to design the stamping die reasonably, then the manufactured parts are much better, which can be concluded through analysis of the following 9 core steps of stamping die design.
9-core steps of stamping die design
Steps of Stamping Die Design 1. Obtain the necessary information
1). Obtain product parts drawings with specific technical requirements. Understand the shape, size, and accuracy requirements of the workpiece. The size (size and position) of the keyhole, and the key surface, analyze and determine the reference plane of the workpiece.
The process requirements of stamping parts are not absolute.
Especially in the current situation of the rapid development of stamping technology, according to the actual needs and possibilities of production, comprehensive application of various stamping technologies, reasonable selection of stamping methods, correct stamping process formulation and mold structure selection, so that it can meet the product technology Requirements, and meet the conditions of the stamping process.
2). Collect process cards for workpiece processing. From this, it is possible to study the interrelationship between the preceding and following procedures, and the processing requirements and assembly relationships that must be mutually guaranteed between each procedure.
3). Understand the production batch of the workpiece. The production of parts plays a decisive role in the economics of stamping processing.
For this reason, the type, structure, material, and other related matters of the mold must be determined according to the production batch of parts and the quality requirements of the parts, and the mold processing technology shall be analyzed accordingly.
The economy and the rationality of public construction production, depict the outline of the stamping process.
4). Determine the specifications and gross conditions of the raw materials of the workpiece (such as sheets, strips, coils, scrap, etc.), understand the nature and thickness of the materials, and determine whether to use less waste and no waste to take samples according to the manufacturability of the parts and preliminary Determine the specification and accuracy grade of the material.
5). Analyze the requirements of the material fiber direction and the direction of the burr in the design and process.
6). Analyze the technical capabilities and equipment conditions of the tool (mold) workshop to make molds and the conditions of the available mold standard parts.
7). Familiar with the equipment information or situation of the stamping workshop.
8). Research and digest the above-mentioned information, and initially conceive the structure of the mold. When necessary, suggestions can be made to modify the established product design and process, so that product design, process, and mold design and manufacturing can be better combined to achieve more complete results.
Steps of Stamping Die Design 2. Determine the process plan and mold structure type
The determination of the process plan is the most important link after the process analysis of stamping parts.
It includes:
1). According to the requirements of the shape feature, dimensional accuracy, and surface quality of the workpiece, perform process analysis to determine its main attributes and determine the nature of the basic process.
Basic processes such as blanking, punching, bending, deep drawing, flagging, and bulging. List all the processes required for stamping. Generally, it can be directly determined from the product parts drawing requirements.
2). Determine the number of processes based on process calculations. For stretched parts, the number of drawing times should also be calculated. The bending parts and blanking parts should also be processed one or several times according to their shape, size, and accuracy requirements.
3). According to the deformation characteristics of each processing, the requirements of dimensional accuracy, and the convenience of operation, the sequence of the process arrangement is determined.
Such as the use of punching and then bending, or bending first and then punching.
4). According to the production batch, size, precision requirements, mold manufacturing level, equipment capacity, and other factors, the single processes that have been initially arranged in the sequence are combined with possible processes. Such as compound stamping process, continuous stamping process, etc.
Generally, thick material, low precision, small-batch, large size stamping parts should be produced in a single process, and simple molds should be selected; thin material, small size, large batch stamping parts should be continuously produced by progressive molds; and the shape accuracy For high stamping parts, composite molds should be used for stamping.
After determining the nature, sequence, and combination of processes, the stamping process plan is determined. That is to say, it determines the structure of each processed mold.
Steps of Stamping Die Design 3. Make necessary process calculations
1). Design the layout of materials and calculate the blank size.
2). Calculate the punching force (including punching force, bending force, deep drawing force, flanging force, bulging force, unloading force, pushing force, blank holder force, etc.), and if necessary, the punching work and power.
3). Calculate the pressure center of the mold.
4). Calculate or estimate the thickness of the main parts of the mold. Such as the thickness of the concave mold, the convex mold fixing plate, the backing plate, and the free height of the discharge rubber or spring.
5). Determine the gap between the convex and concave molds, and calculate the size of the working parts of the convex and concave molds.
6). For the drawing process, it is necessary to determine the drawing method (with or without blanking), calculate the number of drawing times, and the size of the semi-finished product in the intermediate process.
For some processes, such as the continuous deep drawing of strips, special process calculations are required.
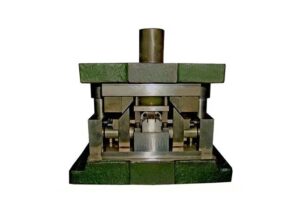
Steps of Stamping Die Design 4. The overall design of the mold
Based on the above analysis and calculation, carry out the overall design of the mold structure (in this case, you only need to draw a sketch), initially calculate the closed height of the mold, and roughly determine the shape of the mold.
Steps of Stamping Die Design 5.
1). Part of the workpiece.
Such as the design of the punch, the die, the punch, and the concave die, and the selection of the fixed form.
2). Positioning parts.
There are many types of positioning devices commonly used in molds. Such as adjustable positioning plate, fixed stopper pin, movable stopper pins, fixed-distance side edges, etc., need to be selected and designed according to specific conditions.
In the continuous mold, it is also necessary to consider whether to use the initial stop pin.
3) Unloading and pushing device.
Such as the choice of rigid or elastic, the selection and calculation of spring and rubber, etc.
4). Guiding parts.
For example, choose guide bushing, guide pin, or guide plate, choose middle guide pin, side rear guide pin, or diagonal guide pin, whether to use sliding guide bushing or ball guide bushing with a steel ball.
5). Supporting pillar and mold clamps, and fastening parts.
Such as the selection of the structure of the mold handle and the upper and lower mold bases.
Steps of Stamping Die Design 6. Select stamping equipment
The selection of stamping equipment is an important part of process design and mold design. Reasonable selection of equipment has a major impact on the quality of the workpiece, the improvement of productivity, and the safety of operation, and it also brings convenience to the design of the mold.
The selection of stamping type mainly depends on process requirements and production batch.
The determination of stamping equipment specifications mainly depends on the process parameters and die structure dimensions. For crank presses, the following requirements must be met:
1). The nominal pressure of the press must be greater than the punching process force.
More precisely, it should be that the load curve of the stamping process must be below the allowable load curve of the press.
For deep-drawn parts, the drawing work needs to be calculated.
2). The mounting height of the press must meet the requirements of the mold closing height.
3). The stroke of the press must meet the requirements of the workpiece forming. For the press used in the drawing process, its stroke must be greater than 2 to 2.5 times the height of the workpiece in the process in order to put it in the blank and take out the workpiece.
4). The size of the table surface of the press must be larger than the outline size of the lower mold base, and a fixed mold position must be reserved. Generally, each side is larger than 50~70mm. The size of the leak hole on the press table must be larger than the size of the workpiece (or scrap).
Steps of Stamping Die Design 7. Draw a general drawing of the mold
The general drawing of the mold (including the drawing of the parts and workpieces) is drawn strictly by the drawing standards (GB/T4457~GB/T4460 and GB/T131-1993).
At the same time, in actual production, combined with the working characteristics of the mold and the need for installation and adjustment, the layout of the drawing can form a certain habit.
The general drawing of the mold includes:
1). Main view
Draw a profile view of the mold in the working position. Under normal circumstances, half of them draw the blank placement before the start of stamping (when the punch slider is at the top dead center position);
The other half draws after the stamping is completed, the workpiece is formed (or separated), and the punch slider is at the bottom dead center. The status of the location.
2). Top view
Usually half of the top view, the other half draws the top view of the top half. Sometimes the bottom half of the top view is completely drawn as needed
3). Side view, bottom view, and a partial cross-sectional view, etc.
If necessary, a side view of the working position of the mold must be drawn. Sometimes a bottom view and a partial cross-sectional view of the upper part of the mold are drawn in the upper right corner of the drawing.
4). Workpiece diagram
The general workpiece picture is in the upper right corner. For the work completed by several sets of molds, in addition to drawing the workpiece drawing of this process, it is also necessary to draw the workpiece drawing of the previous process.
5). Layout drawing
For progressive dies, it is necessary to draw the layout method, process arrangement sequence, and the stamping content completed by each step; the step spacing, the edge value, and the stripe size should be marked.
The layout drawing of the blanking die needs to indicate the layout method, strip size, and the size of the edge value.
6). List the parts list, indicate the materials and quantity.
All standard parts must be selected specifications.
7). Technical requirements and instructions.
Technical requirements include punching force, selected equipment model, overall mold tolerance and assembly, installation and debugging, mold closing height, mold clearance, and other requirements.
Steps of Stamping Die Design 8. Draw parts diagrams of non-standard parts
All dimensions, tolerances and fits, form and position tolerances, surface roughness, materials used heat treatment requirements, and other technical requirements should be indicated on the parts drawing.
Steps of Stamping Die Design 9. Fill in the mold record card and write the stamping process file
For small batch production, the process route list should be filled in; while for mass production, it is necessary to formulate process cards and procedure cards for each part.
You may also be interested in the below articles:
Summary Of 50 Injection Mold Structure Operation Dynamic Diagrams